High quality Sealing Technology with O-rings: with more precise Tolerances even more efficient
The O-ring has provided evidence to be an efficient and cheap sealing element in many ways, for example as secondary seal in a floating ring seal of the feed water pump of a nuclear power plant or as seal at a temporary screw-in connection for air conditioning systems in cars. There are a lot more examples like these where O-rings have met the requirements of highest demands on leak tightness and this in different media and at different temperatures from -60 °C to 300 °C. O-rings are readily available to the market, easily mounted and require only simple seal housing. Hence it is especially annoying for design engineers if O-rings have to be discarded as sealing elements for problem solving because there is too much variance in their measurements. To fall back on other seals will generally be more expensive for the user.
Particularly when smaller O-rings are applied the common tolerances according to DIN 3771 part 1 constitute a considerable constraint regarding their applicability. This paper shows reasons for variances in the measurements of O-rings due to the manufacturing process and portrays the resulting effects on function. It describes a new and highly accurate optical measurement process for O-rings which is re-offered as service for the measurement and sortation according to precise tolerances.
How are the Dimensional Fluctuations of O-rings caused?
There are three influencing factors mainly due to the manufacturing process:
- Fluctuations of mould temperatures during the curing of O-rings
- Variances in shrinking behaviour of rubber and other compound ingredients
- Mould offset due to the diameter clearance of the guide bolt which increases through abrasion over operating time.
Fluctuations of temperatures can lead to massive variances of diameter measurements within the same batch especially if O-rings are manufactured with big moulds. Even during highly temperature controlled processes like the ones which are possible with small injection moulds, clearly measurable fluctuations of inner diameters can occur due to batch related variances of compound and small batch related temperature differences.
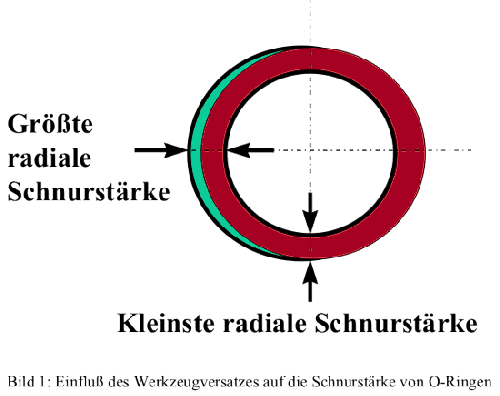
For the generally more important functional dimension of O-rings, the cord thickness, there is a further essential influencing factor, namely the mould offset. Figure 1 illustrates through a simple top view on an O-ring (upper mould half = red; lower mould half = turquoise) how due to the offset of upper and lower half variances of cord thickness can occur on an O-ring. While this offset is normally smaller than 0,05 mm on new injection moulds, it can increase significantly due to abrasion and may add up to 0,08 to 0,15 mm according to DIN 3771 part 4.
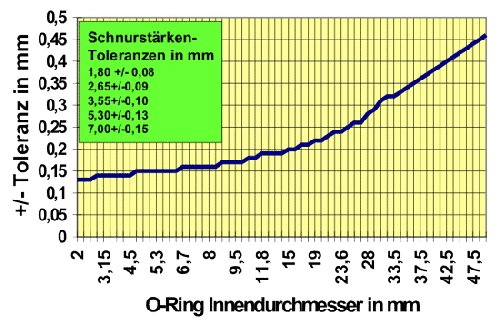
The three influencing factors outlined above have led to the measurement tolerances according to DIN 3771/part 1 (figure 2) and most O-ring manufacturers supply according to these tolerances. It is difficult to find suppliers of O-rings who narrow these tolerances considerably (and maintain them). Especially for small O-rings this would make sense because the allowed tolerances are too generous in the eyes of the user. This is illustrated by a comparison of two standard sizes: The O-ring with the measurements (inner diameter x cord thickness) 2,0 +/-0,13 × 1,80 +/- 0,08 has significantly more unfavourable tolerances than the O-ring 20,0 +/-0,22 × 3,55 +/-0,1. While the tolerances of the small O-ring amount to +/-6,5 % regarding the inner diameter and +/-4,4 % regarding the cord thickness, the tolerances of the larger O-ring with +/-1,1 % regarding the inner diameter and +/-2,8 % regarding the cord thickness are considerably more favourable. The proportion becomes even less favourable if a smaller cord thickness is used, for example 1 mm, because manufacturer tolerances do not decrease substantially.
The Influence of Variances in Cord Thickness and Inner Diameter Tolerances on the Functional Behaviour of O-ring Seals
The seal effect of O-rings is based on generating surface pressure through the deformation of the O-ring cord thickness. As rubber materials do not behave ideally elastic, O-rings need a minimum deformation of approx. 6 % of the cord thickness. When the deformation remains under this value, the compression will soon be 100 % especially regarding small cord thicknesses. Typical values for the compression of cord thickness range from 20% to 29% for a radial sealing static sealant and from 12% to 22% for a dynamic sealant [1], each related to an O-ring cord thickness of 1,78 mm with a nominal diameter of 20 mm and a concentric position of the components which are to be sealed. Considering also the maximal possible eccentricity, the range of variation can get even wider depending on the size of the diameter clearance.
As the reaction forces of a deformed O-ring proceed progressively over the relative deformation [2], see figure 3, this means a proportion of maximal to minimal deformation respectively friction force of ca. 3:1 for the dynamic sealant in the example above. Because of this possible variance O-rings are discarded as sealing solutions for many dynamic applications due to the massive tolerances. For static O-ring applications these typical variances of deformation forces mean sealing face pressures which are dependent on tolerances that have a substantial influence on the leakage rate of O-ring connections [3]. However, because statically applied O-rings generally are deformed much more as dynamically applied O-rings, this effect does not constitute an untenable constraint.
Better Measurement Technique – The first Step to narrower Tolerances
In its second part the O-ring standard DIN 3771 prescribes that O-rings are to be measured contactless regarding the O-ring cross section, the number of measuring points however remains open. Considering the influence of the mould offset meaningful data for the radial cord thickness can only be obtained by averaging as many single values over the entire perimeter as possible. According to DIN 2771 measurements with conical test mandrels and mandrels with different levels are allowed. For small O-rings this process is clearly unsuitable in relation to accuracy and repeatability.
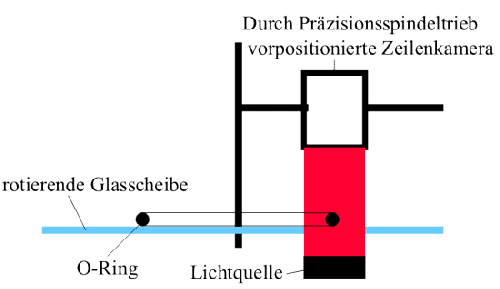
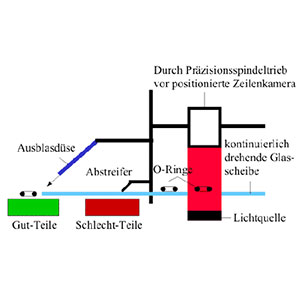
A measurement and sorting machine which was particularly developed for the measurement of O-rings has been commissioned by the O-Ring-Test-Laboratory Richter. Through the combination of a line scan camera which is controlled by a linear drive and a rotatable glass measuring table it is possible to measure O-rings and also other seals with an inner diameter from 0 to 400 mm contactless very accurately. (Figure 4 and 5 depict the measuring principle for small and large O-rings. Besides outer and inner diameter cord thickness or wall thickness can be measured.
In comparison with already existing measurement machines out-of-roundness due to limpness of seals is not included as measurement error. Because of the evaluation of several thousands of measuring points over the perimeter and the following evaluation through a patent pending evaluation process a very good repeatability and a high accuracy of measurement is guaranteed by the contactless measurement of specimens. Besides the inner and outer diameter you get the average value and the selective minimum and maximum of the cord thickness as results. Thereby reliable data about the functionality of the O-ring can be obtained because in this way increased offset and flash can be detected. Essential for this measurement process is also that it can be performed for dimensions up to an outer diameter of 25 mm almost at one second intervals and due to a blowing device a sortation by good parts and bad parts can thereby be realised cost-efficiently. However, large seals can also be measured within seconds. Through the correlation of measurement results or the limitation of tolerances standard O-rings become high-precision sealing elements.
Realisable Tolerances for small O-rings
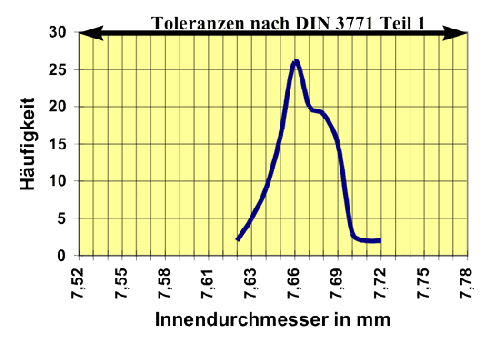
The progress of technology has clearly not stopped at the production of small O-rings. Be it the precision of the production of moulding tools or their rheological dimensioning by calculation programmes, be it the temperature control of injection machines by use of microprocessors or by applying refined deflashing procedures, all of this makes it possible that in the meantime a very narrow normal distribution regarding functional dimensions is feasible, see figure 6 and 7. A check on customary NBR-O-rings of different suppliers (inner diameter < 20 mm) showed that more than 90 % of the tested O-rings complied with clearly narrower tolerances. Useful tolerances, meaning that over 90 % of the parts shall comply with, can be at an average of radial cord thickness of +/- 0,03 mm and an average of inner diameter of +/- 0,05 mm regarding nominal size. This would of course imply that the injection mould is dimensioned exactly for the desired mean and the used rubber material and that the maximal permitted value for the mould offset according to DIN 3771 is not fully used. Through this narrowing of tolerances the possible range of variation of the derformation of the cord thickness can be limited considerably und thereby the field of application of this O-rings especially for dynamic applications can be expanded significantly.
Measuring and Sorting as Service
As a service company which was founded by an O-ring specialist the O-Ring-Test- Laboratory Richter offers among others the measuring and sorting of O-rings and other seals according to given tolerances compliant with the measurement principle outlined above. Due to the fast measurement the sortation is economically applicable even for large batch sizes.
Beyond that the test laboratory offers all typical test methods for the qualification of new seals and the incoming goods inspection and testing of serial parts. Consulting and training which is independent of suppliers can help to find good sealing solutions quickly, to shorten development periods and to write reasonable purchase specifications. Through the use of modern testing technologies accompanied by knowledge about the performance of different rubber materials, economical sealing solutions even for special applications can be found.
References
[1] inPHorm, PC-Programme for the calculation and selection of O-rings, Parker Dichtungen [2] Dale Patterson, More Tips for Seal Design: Effects of Cross-Section Compressive Forces, company publication Greene Tweed [3] Klaus Scheerer, Einfluss der mechanischen Eigenschaften von O-Ringen auf deren Verhalten in Miniatur-Dichtverbindungen, Dissertation Universität Stuttgart